Thursday, July 26, 2012

Rag Doll Dress

My sweet friend gave my girls some rag dolls she found at the thrift store. This lil' doll was in a little red dress that didn't really match. It has bothered me ever since we got the cute dolls (over a year ago). I have been toying with the idea of making my own little rag dolls when I remembered this lil' doll and decided to make her a new dress instead.

Her tights and shoes are sewn on, so it was obvious the red christmasy dress she had on didn't go (sorry, I forgot to take a picture before I ripped it apart to use as my pattern). 
The fluffy white trim was so fun I decided to keep it and add it to this dress. 

I also made a lil flower and sewed it to a bobby pin to stick in her hair.

This costume sateen moved a lot, and could be tricky to work with...BUT because it was just a dress for a doll I wasn't too particular in my accuracy and I melted the edges to keep it from fraying (instead of serging...which is hard to do without a serger). 
It was awesome and saved so much time!
It was a quick project to get my craft fix for the day.

I'm pretty sure the dollie is much, much happier. 
Doesn't she look so?

Have a lil' doll that needs a fashion update?

Craft. Me. This.

Wednesday, July 25, 2012

Baby Walker Redo


While I was visiting my Mother in Law in Minnesota, she had some friends give her random baby items to make our visit more enjoyable. 

One of them was this old walker.
 My lil' man loved it (and they just don't make the new ones the same), so we took it home with us (it folds flat... so nice for storing).

Well, my lil' fella is learning to eat and of course he is getting lil' puffs and rice rusk goo all over the cover. I didn't really mind the dated look, but when I took it off to wash it I realized how gross it was. And it was falling apart.
No Bueno!
Can you see all the gunk (mold?!!) down at the bottom by the grommets? Yuck! 

So I pulled the old thing off, took a seam ripper to it, 
and took it apart to use the old pieces to make a pattern.

I was hoping to reuse the old foam padding...
but it was so well-loved that it was disintegrating. 
Once I got the old trim off it came pouring out all over the table. 
I tried taking outside to shake it all out, but it was never-ending.
So much for reusing the old padding...

However, I was able to selvage the trim. It was actually in really good condition.
I had a grommet kit in the house, some old fleece fabric (to use as my padding/batting), and fabric. 
It was nice to just use up some thing I had on hand (even nicer not draggin my kiddos to the craft store).

A few hours later and it was done!
I was surprised how quick it all came together.
My client was quite satisfied!

I decided that I wanted to use vinyl this time so I could wipe up the gooey messes the lil' mister made. I didn't have any vinyl fabrics on hand, but I did have some iron-on vinyl on hand so I just ironed it on to this cute dino fabric and it was perfect. Added an extra step, but it was well worth it.

Mr. Z thinks it is much more fun to play in.
Slime on lil' man, slime on!

So do you have a hand-me-down that you want to give new life to?

Craft. Me. This.

Monday, June 4, 2012

Father's Day Advent Calendar


Here is a fun way to count down to Father's Day this year.
It is a combination of a few ideas I saw on the wonderful pinterest.  

Inside each envelope is a little card that tells where the little gift is hidden for the day. 
We are actually going to be away from our Dad this year, so we set it up for him to find surprises around the house each day while we are gone. 

Wanna do Father's Day a little different this year?

Craft. Me. This

Super Dad Printables found HERE.

Monday, March 5, 2012

Daddy's Back Rub T-shirth

When I saw this cute gift idea, I knew it was a must do for the hubby.


It is a "Back Rub" t-shirt.
Or... more like a race track t-shirt, but the idea is that when the kids drive the cars on Daddy's back it is like giving him a back rub. 

It was a hit. A laugh out loud hit.
Just what I was going for.

And the girls beg him to put it on so they can drive all over his back.

So fun, and such cute memories. 

Craft. Me. This. 

T-shirt: Target $5
Tutorial: Car Shirt
She hand paints everything... but I was lazy and just used sharpies.
Be sure to put paper in your shirt so it doesn't bleed through to the front.

Saturday, February 25, 2012

Birthday Crown

Make birthdays a little extra special at your house with a birthday crown.

It just makes me happy... I want to wear it on my birthday too.

I was in the middle of making my advent calendar ornaments...
so I went a little crazy and blanket stitched all of the letters

 But it was worth is... doesn't it look so cute?

And of course... if big sister tries it on...so does little sister.

Wanna add this to your birthday fun?

Craft. Me. This

Sorry... no tutorial to link up, I just copied a friend who had made this.

Thursday, February 23, 2012

Camping Satchel

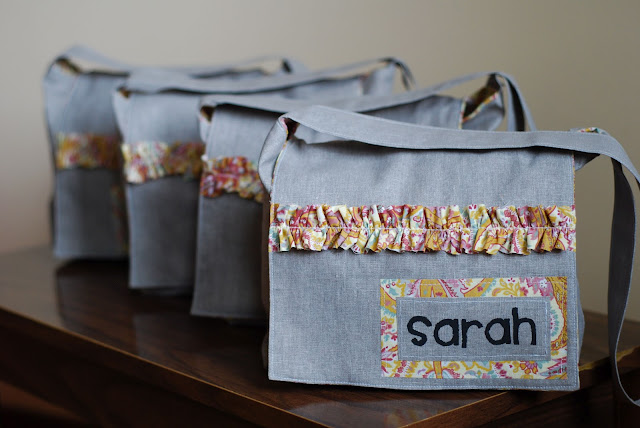
 We had a birthday party at our house, and made these quick and easy satchels to go along with our camping birthday theme.
 It was the perfect size for holding our little party favors.
 It has a pocket on the back.


I love gathered fabric... it looks so cute on the front of this bag.

I also have never done the freezer paper paint, but tried it out with this project... 
it was a very quick and easy way to personalize the bags. 

I won't lie... I really love to look at them.

I really think it turned out so cute.

Here they are.
All lined up and ready to be handed out at the party.

So, if the lil' person in your house needs a satchel to tote around treasures...

Craft. Me. This.


Satchel Tutorials: 
and 

Monday, February 20, 2012

Heart Hand Warmers

These were the hand warmers that we made for a teacher gift.
At the preschool the kids are able to go and play outside in a little play area everyday.
Unless it is raining or below 25º.
So that means these poor teachers have to stand outside with them an monitor them.
So, when I saw this clever idea all over pinterest I knew it was the perfect Valentine gift for our preschool teachers. 

On the back it said,
"You warm my heart"
with heating instructions (30-60 secs in the mic)
It was a quick and easy Valentine to whip up to show the teachers how much we appreciate them.

Even though Valentine's Day has come and gone, these still are a fun gift idea to give for no reason at all... or to make for yourself to keep your hands warm.
So if you want a warm heart and warm hands...

Craft. Me. This.

Best tutorial I've seen: Heart-Warmer